Non-Vendor Checks
Select Non-Vendor Checks to record and issue a check for a Vendor.
| Access |
| Grant permission to User Profiles in Access User Profiles > select a User Profile > Security > Accounts Payable > Menu Security > Documents > Non-Vendor Checks. |
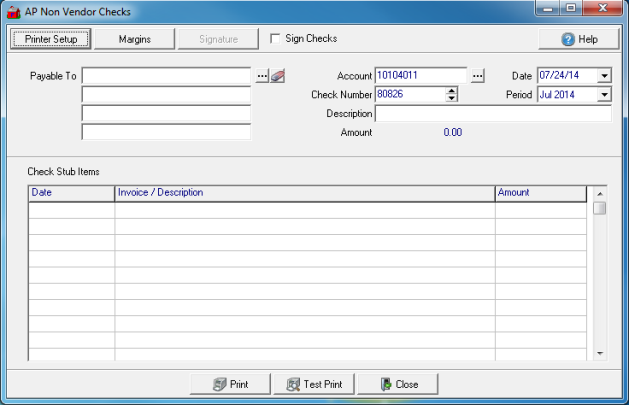
Enter the Name and address in Payable To of who the check will be issued. Use  to search for an existing account.
Account indicates the bank account the check will be written against as set in Access Parameters > AP > AP Cash Account or select to search for an alternate account.
At the top of the window, select Sign Checks to include a printed signature on the check. When selected, the Signature button becomes active which can be used to update the positioning of the signature on the check.
Check Number will default to the next available check number for the Account selected. Change the check number using the up or down arrow.
Enter a check Description of the transaction in this 30 character alpha-numeric field.
Amount automatically totals the amounts included in the Check Stub Items field.
Defaults to the current Date. Select the drop down calender to select an alternate check date.
Defaults to the current Financial Period. Select the drop down menu to choose the previous period.
Check Stub Items- Enter the date, description and amount of the transaction.
Print the Non-Vendor check
Select Print which presents the GL Distribution window for the check.

The top portion of GL Distribution for the check confirms basic information about the check.
- Date- Confirmation of the check date
- Period- The Period the check will be posted.
- Module- Confirmation of the Accounts Payable module.
- Type- Transaction type, CH for Check
- TTR- Transaction Tracking Reference for this transaction.
To modify the GL accounts this check will be written to, select

|

|

|
The bottom portion of GL Distribution includes
- Entry Totals- Totals for the Debit and Credit columns which should equal.
- Amount Needed to Balance- If there is a imbalance between the Debit and Credit columns, the amount of the difference will be displayed.
Select Post to generate the check and post the amounts to the selected accounts.