New AP Workflow Adds Invoice Approval
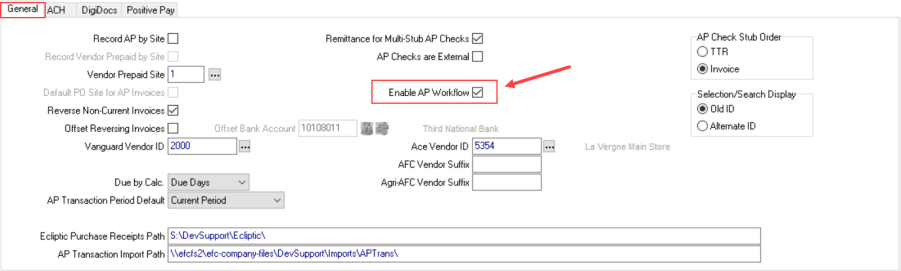
The ability to control entry and approval of accounts payable invoices separately is now available in Merchant Ag FIN. Enable this new functionality by navigating to Merchant Ag FIN > Admin > Installation > Access Parameters > AP > General and select the new parameter Enable AP Workflow. Once active, when a user with an AP queue logs in, the count of Unapproved AP Transactions appears in the lower right hand side of the main screen.
Access User Profiles
Create AP Invoice Approvers
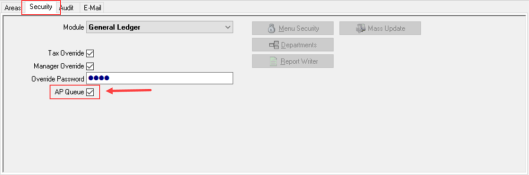
Create a list of Approvers to select from by navigating to Merchant Ag FIN > Admin > System Security > Access User Profiles > select a Profile > Security tab > and select the AP Queue checkbox. Any User Profile with AP Queue selected is eligible to have invoices assigned to them for approval.
Approve Invoices for Payment
On the Security tab, select Accounts Payable as the Module and click Menu Security. Scroll down to the Transaction section and select Approve Unapproved and choose a permission level
- 0 - None
- 1 - My Invoices allows approval of invoices assigned to the User Profile only.
- 2 - Mine and Unassigned allows approval of invoices assigned to the User Profile and Unassigned.
- 3 - All Users
User Profiles can be designated for an AP Queue or assigned Approve Unapproved permissions separately or can be assigned both.
Use Enter Unpaid to Assign an Approver
All invoices entered with Enter Unpaid are considered unapproved. With the new functionality, assign invoices to a specific AP Queue user for approval using the Sent To field or this field can be left blank as an Unassigned invoice. Click the search button in the Sent To field to access the Select AP Approver window and select the Approver.
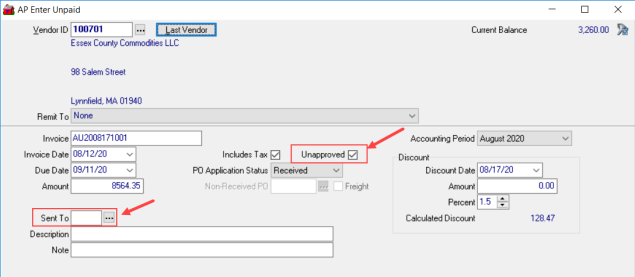
Click Add to add the invoice to the AP Appovers queue.
Note: The ability to edit any invoice found on the Pending tab in Access Vendors remains available.
Approve Invoices
User Profiles with an AP Queue will access AP > Approve Unapproved to approve invoices. Use the Vendor Selection section to retain the default of All Vendors, One Vendor or Range of Vendors. Create a range of Vendors by entering the Vendor IDs in the From and To fields.
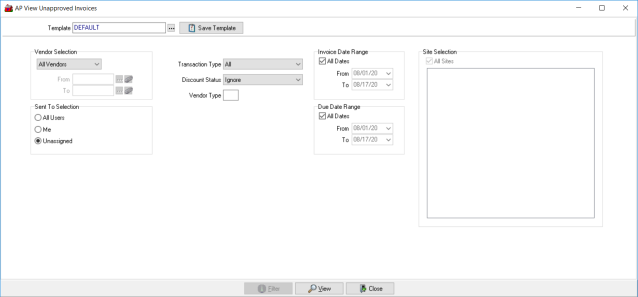
The invoices listed can be further refined by using the Sent To Selection and selecting All Users, Me or Unassigned.
Use the Transaction Type drop down list to choose All, Invoices or Credit Memos.
Focus on a specific Discount Status of Discount Available, No Discount Status or All to filter the invoices listed.
When using All Vendors as the Vendor Type, filter the listing by entering a Vendor Type if indicated in Vendor accounts.
Invoices can be filtered by entering a date range in either the Invoice Date Range, Due Date Range or both.
Click View to open View Unapproved Invoices.
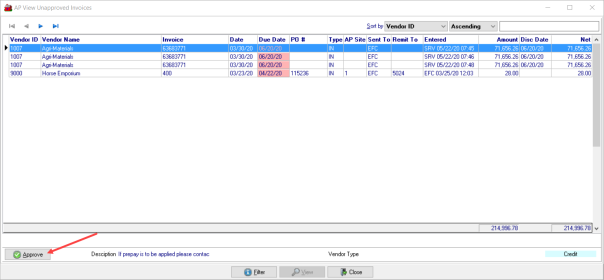
Select an invoice and click the Approve button or double click which opens the Approve Unapproved window which duplicates the fields from Enter Unpaid. Use this window to edit any information regarding the invoice. As invoices are selected the Approve field which displays the invoice Description and Vendor Type if any. Any credit invoice included on the grid will be shaded with light blue.
Click  to approve the invoice for payment that opens the Approve Unapproved window. Click Approve in the bottom left hand corner.and open the GL Distribution window to select a GL account for the debit entry of the journal entry.