Use Enter Unpaid to enter AP Vendor invoices for payment and match the invoice to the associated Purchase Order. As invoices are entered, they will be paid using the Range of Vendor Checks process. See Range of Vendor Checks for more information. In addition, the Transactions tab on the AP Vendor account will accumulate all invoice information. Learn the specific steps for using Enter Unpaid for Items and Monthly Expenses by clicking the title. Look for  which indicates a required field.
| Access |
| Grant permission to User Profiles in Access User Profiles > select a User Profile > Security > Accounts Payable > Menu Security > Transactions > Enter Unpaid. |
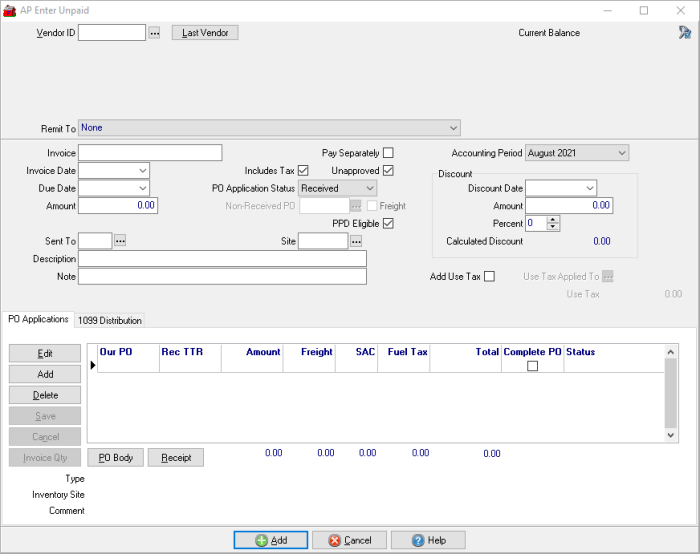
Enter the Vendor ID or select  to search.
When a Vendor has been selected, the Current Balance will be displayed.
Use the Remit To drop down list if payment will be made to a Third Party Payee. See Access AP Vendors > Third Party Payees for more information.
Enter the Invoice number for the Vendor.
Enter the Invoice Date or select from the drop down calendar.
Enter the Amount of the Invoice. Leave blank if using the PO Applications section, the amount will populate automatically based on the Purchase Orders selected.
If using the PO Application Status section, use the drop down list to select the Receive status of the Purchase Orders.
- Received- Items indicated on the Purchase Order have been received.
- Non-Received- Purchase Order has been placed but no Items have been received.
The Non-Received PO field is active if Non-Received is selected, click to select the Non-Received PO referenced in the Invoice.
Freight becomes active if Non-Received is selected to indicate this is a freight invoice for a Purchase Order not yet received.
Use the Pay Separately checkbox to indicate this invoice will be paid by a separate check. Navigate to Access AP Vendors > General to flag all invoices from the vendor as Pay Separately. Invoices entered that have been flagged as Pay Separately the Due Amount will appear in the Vendor account on the Transactions tab highlighted in blue.
Click Includes Tax if the invoice includes tax.
Select Unapproved to indicate the invoice needs to be approved before payment. Learn about enabling an AP workflow that requires invoice approval here.
Invoices entered with the PPD Eligible checkbox selected are eligible to be paid using an Vendor Prepaid. Once the invoice is entered, access the Vendor account and select the Prepaids tab.
Enter the Site ID for the invoice or click the to search.
Select the Current or Previous Accounting Period from the drop down menu.
Provide the name of who will approve the transaction in the Sent To field if needed. This is an optional field.
Enter a Description in this 40 character alpha-numeric field. The Description field will print on the Vendor check.
Enter a Note in this 40 character alpha-numeric field. The Note field does not print on the Vendor check.
Select the checkbox to calculate Add Use Tax on the transaction. This option is available if the Record AP by Site parameter is active found in Merchant Ag FIN > Admin > Installation > Access Parameters > AP > General.
Enter the Use Tax Rate that should be applied.
Provide the Use Tax Applied To amount that Use Tax should be calculated on.
The calculated amount of Use Tax will be indicated.
Discount
This information will populate automatically if provided in the Discount Calculation section on the AP Vendor account. This section can be used to enter discounts offered on the Invoice instead of using the account defaults.
- Discount Date- Select the Discount Date from the drop down calendar. This is the date the Invoice must be paid by to receive the discount.
- Amount- Enter any amount of discount indicated on the Invoice.
- Percent- Enter any discount percentage indicated on the Invoice.
- Calculated Discount- Calculates the discount for invoice if paid by the Discount Date.
- Add Use Tax- Select to calculate Use Tax.
- Use Tax Rate- Enter the Use Tax Rate that should be applied.
- Use Tax Applied To- Enter the amount that Use Tax should be calculated on.
- Use Tax- The calculated amount of Use Tax will be indicated.
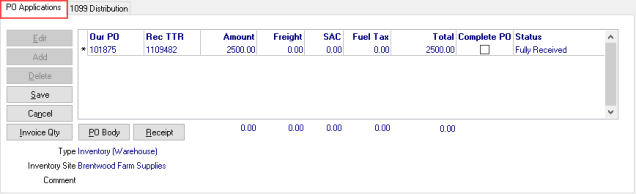
PO Applications
Use the PO Applications section to match Inventory and Non-Inventory Purchase Orders to Vendor Invoices. Learn more about entering transactions for Vehicle Tracking here.
 - Select to access the Select PO screen. Select the PO that is referenced on the invoice and repeat this process for each PO on the invoice then select Save. Search for a Purchase Order by Dealer Request ID or by Bill of Lading.
 - Select Edit after a PO has been selected to edit the Amount or Freight amounts.
 - If a PO needs to be removed from the PO Applications grid, select the PO and then click Delete.
 - Click Save after all Purchase Orders have been added to the section.
 - Select Cancel to remove a PO from the PO Applications grid prior to being saved.
 - View the items included on body of the Purchase Order by selecting the PO then select PO Body.
 - Click to access the Purchase Order receipts to edit the unit cost of items.

Enter the New Unit Cost and retain Update Vendor Cost to update the Item replacement cost.
After a PO has been selected, the following fields are populated with information.
- Our PO- The Purchase Order number.
- Rec TTR- Receiving TTR, Receiving Transaction Tracking Reference number.
- The Amount column displays the total for received items. For Inventory and Non-Inventory PO's, the amount in the Extended Cost column on the PO body is included. If the amount to be paid is different from the PO total, click into the field enter the actual amount in this field.
- Freight- The amount of freight incurred to receive items as charged by the Vendor. This amount is the amount entered during the PO receipt process and can be edited by clicking into the field.
- SAC- Expected Services, Promotions, Allowances and Charges, the Actual amount of SAC from the Purchase Order. This amount is the amount entered during the PO receipt process and can be edited by clicking into the field.
- Total- The Total of Amount plus Freight.
- Complete PO- Select this check box to Complete the Purchase Order.
- Status- Indicates Fully Received or Partially Received.
 Select to record the quantity of Items invoiced.
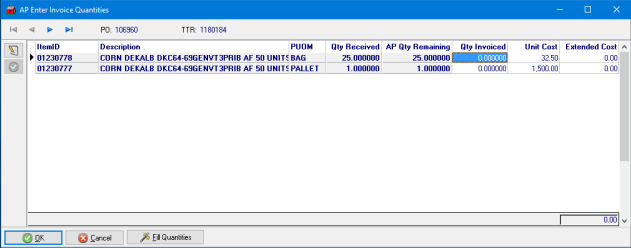
Use the Fill Quantities button to accept the AP Qty Remaining quantities indicated on the invoice.
Select OK to accept all quantities entered.
As Purchase Orders are selected in the PO Applications section, view the information below for additional information.
Type- Confirms the Type of Purchase Order selected, Inventory or Non-Inventory.
Inventory Site- Provides the Site Name of where the Purchase Order was placed.
Comment- Any comment added to the Notes field on the Purchase Order summary tab will be visible here.
1099 Distribution
For AP Vendors with Issue 1099 selected on their account provide the amounts of the invoice eligible for 1099 reporting.
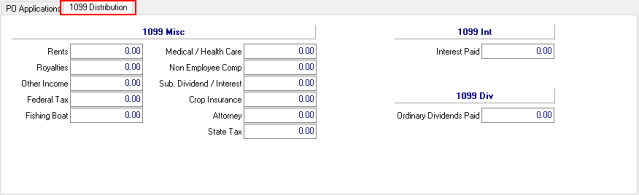
1099 Misc- Indicate any amount that should be reported on the 1099 for the following categories.
|
|
|
|
|
|
|
|
|
|
|
1099 Int- Indicate any amount that should be reported on the 1099 for
- Interest Paid
1099 Div- Indicate any amount that should be reported on the 1099 for
- Ordinary Dividends Paid
Select  to add the transaction to Accrued Accounts Payable for payment and Access AP Vendors > Transactions. Learn more here.