Create a Vendor Prepaid to place an amount on deposit with the Vendor for payment of invoices. Apply amounts from the Prepaid to Invoices from the Vendor Prepaids tab. Select Prepaid Status in the Reports menu for a list of current Vendor Prepaids. See Use a Vendor Prepaid for more information. Look for  which indicates a required field.
Enter Vendor Prepaids is now available to Owned Stores by enabling the Enter Vendor Prepaid parameter. See Access Parameters > AP > General for more information.
| Access |
| Grant permission to User Profiles in Access User Profiles > select a User Profile > Security > Accounts Payable > Main Menu > Transactions > Enter Vendor Prepaids. |
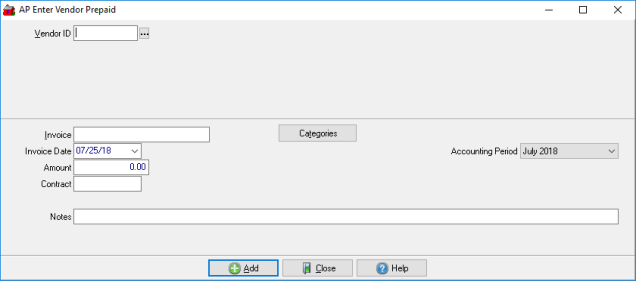
Click into the AP Vendor ID field and enter the Vendor ID or select  to search.
Enter the Invoice number in this 18 character alpha-numeric field.
Provide the Invoice Date using the mm/dd/yy date format or select using the drop down calendar.
Enter the Amount of the Prepaid.
Any Contract ID issued from the AP Vendor will be entered in this field.
Use the Categories button to specify the Item Categories available for the Prepaid. Categories can be selected for a new or existing Vendor Prepaid.
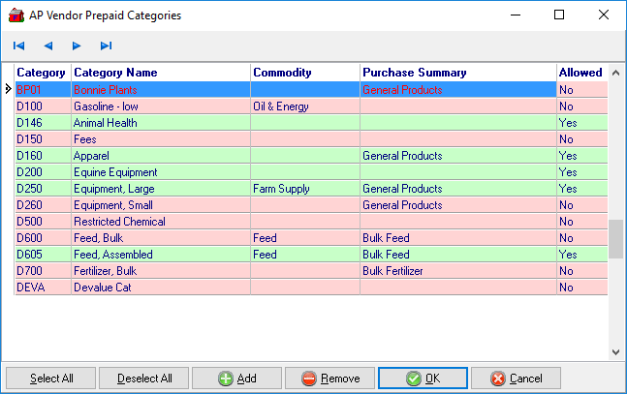
See Access Vendors > Prepaids for information on using Prepaids with Categories for invoices.
The Accounting Period defaults to the current Period or previous Period can be selected from the drop down list.
Enter a Note in this 80 character alpha-numeric field.
Select Add when all information is supplied and adds the transaction to the AP Vendor account balance.