After Patronage checks are written, Equity checks can be generated for Qualified or Non-Qualified Reserve or distributed by percentage to oldest first.
| Functionality |
| Optional: In Merchant Ag PM > Admin > Installation > Access Parameters > Company, select Print Equity Balances by Entity for the patronage check stub to reduce the values of the Qualified and Non-Qualified for the Patronage Entity to only show it's Entity balances. |
| Access |
| Grant permission to User Profiles in Access User Profiles > select a User Profile > Security > Accounts Receivable > Patronage/Equity > Equity Checks. |
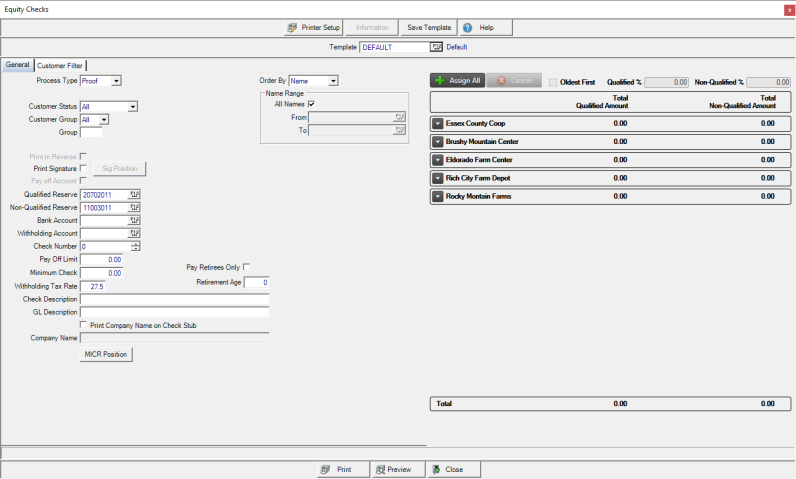
Choose a Process Type of Proof, recommended to review, then Checks. When Proof is chosen, use Preview to view the Customer IDs that will receive a check.
Equity checks can be generated for either All or Active Only customers using the drop down list available in Customer Status.
If using Customer Group, select All or an individual group. This group refers to the Customer Group in billing section of customer detail.
Enter a Group if applicable, which uses the Group field found on customer detail > Settings. All groups are included if left blank.
Print in Reverse will print checks in reverse order and becomes active when Process Type is set to Checks.
If Print Signature is selected, the signatures associated with the Bank Account will be printed on checks automatically. Use the Sig Position button to set the position for checks requiring one signature. The position is adjusted automatically when two signatures will print.
Select Pay off Account to pay off accounts. This field is active when one account is selected.
Further refine the customers retrieved by using the Customer Filter.
Enter the ID of the full General Ledger account for Allocated Reserve or select F12 to search.
Select the Qualified Reserve General Ledger account that will be used to write any Qualified Reserve check against by entering the account ID or use F12 to search.
Select the Non-Qualified Reserve General Ledger account that will be used to write any Non-Qualified Reserve check against by entering the account ID or use F12 to search.
Choose the Bank Account Equity checks will be written against.
Enter a Withholding Account which will the be the GL account written to if a withholding percentage is entered.
The next available Check Number defaults automatically to the next available check number when the bank account is selected.
Provide the Pay Off Limit, if paying off allocated reserve, if the customers reserve is less then the pay off limit the check is written for the full amount of the years selected.
The Minimum Check amount indicates that only checks above this amount will be generated.
Enter a back up Withholding Tax Rate to be used in instead of the Backup Withholding Rate entered in Merchant Ag FIN > Admin > Access Parameters.
Use the Pay Retirees Only checkbox to generate checks of 100% of equity for customers who meet or exceed the Retirement Age entered in Merchant Ag FIN > Access Parameters. To use this function, a Customer birthday must be entered in Customer detail > Credit.
Enter up to 40 alpha-numeric characters for a CheckDescription.
Enter any GL Description for the General Ledger and check register.
Click the Company Name checkbox to print the Company Name on the check stub which defaults from the Company name found inMerchant Ag FIN > Access Parameters > Company but can be edited.
Use the MICR Position button to set the bottom and right positions.
Determine how checks will print by selecting ID, Name or Zip Code in Order By drop down list.
Equity Checks can be generated for specific Customers by creating a Name Range. Remove the selection of All Names and enter customer names in the From and To fields.
Choose To Distribute Equity Manually or Automatically
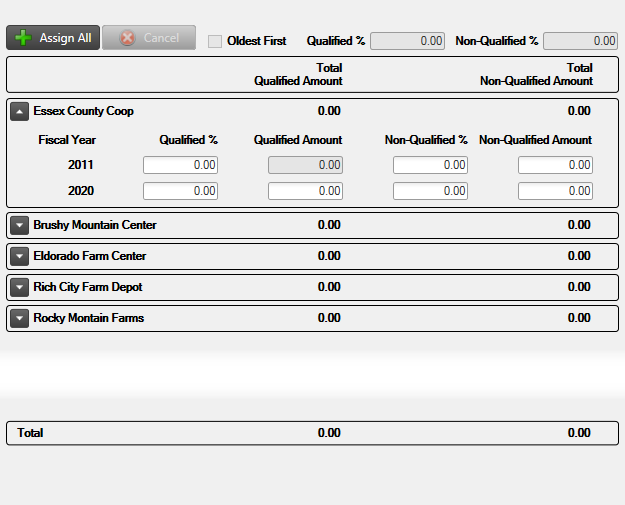
Assign Equity Manually
Expand the Entity to list each Fiscal Year.
Enter a percentage or amount in either the Qualified or Non-Qualified columns.
The columns are totaled automatically.
Assign Equity Automatically
Automating the distribution of Equity is a two step process of assigning then applying the equity to eligible member within the entity. Use Oldest First to distribute equity to the oldest Fiscal Year first or select individual Fiscal Years or Entities by removing the checkmark to the left of the Entity name.
Click the  button which adds an All option in the Entities grid with all available Fiscal Years listed.
 Click the Oldest First checkbox to enable the Qualified and Non-Qualified percentage fields. Enter the percentage in either or both fields to apply to each eligible member beginning with the oldest Fiscal Year first. Click
  to distribute the equity. Once applied, values and percentages are visible on each fiscal year but can not be edited. Exclude an entity by removing the checkbox to the left of the entity name before clicking Apply.
To pay Qualified and/or Non-Qualified Equity, expand the Entity and provide a percentage or amount in the appropriate Fiscal Year.