Add a New Customer
Add a new Customer account during Order Entry or when creating a Prepaid using the Quick Add process. Select  , the Quick Add Icon to begin. From the Add Customer window, supply all applicable information in the active fields. Look for
  which indicates a Required Field.
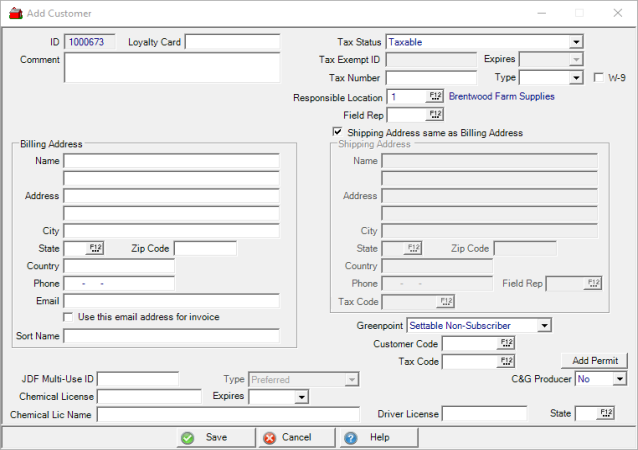
Unique System generated number ID is automatically added.
If participating in a Loyalty Card program, enter Loyalty Card ID in this optional field.
- Active if participating in a Loyalty Card program, enter the Birthday month from the drop down menu and enter the date, an optional field.
Enter a customer Comment in this optional 70 character alpha-numeric field.
Select an applicable Tax Status from the drop down menu, the default selection is Taxable.
|
|
|
|
|
|
|
|
|
|
|
Enter the Tax Exempt ID if an exempt tax Status has been selected.
Select the Expires date of the Tax Exempt expiration using the drop down menu.
Enter the Tax Number and choose a Type as SSN or EIN number.
Select W9 if a W9 has been or will be received from the customer.
Set a Responsible Location, if using, by entering the Site ID or search by selecting the F12 key.
Choose a primary Field Rep by entering the ID or use F12 to search.
Billing Address section
Name Enter the Customer Name.
Address Enter the Customer Street address
Enter the Zip Code to automatically populate the City and State fields.
Enter the City and two letter State abbreviation if manually entering.
Country is an optional field.
Enter the Customer's Phone number. This can be used to search for accounts by entering the phone number in the Open Order Detail screen.
Enter a valid Email address in this optional field.
Select the Use this email address for invoice to email all invoices instead of printing.
Enter the Sort Name for this Customer. This may be a required field if required when creating a customer accounting using AR > Access Customers.
Any JDF Multi-Use ID can be entered the JDF Credit plan number.
- Type - Select Preferred or Merchant Authorized from the drop down menu for the JDF Multi-Use ID.
Enter the Chemical License ID of the type of chemical license held.
Provide the date the Chemical License Expires by selecting from the available drop down calendar or enter using the mm/dd/yy date format.
Enter the Chemical License Name which is name of who holds the Chemical License in this 40 character alpha-numeric field.
Shipping Address
Enter a Shipping Address if it's different from the Billing Address. By default, the checkbox Shipping Address is the same as the Billing Address, is selected.
- Name - Enter a Shipping Address Name
- Address - Enter the Shipping Street Address
- City - Enter a Shipping City
- State - Enter the Shipping State
- Zip Code - Enter the Zip Code which will populate the City and State fields for the Shipping Address.
Ag Monthly Publications will be titled with the name of your publication. Manage customer subscriptions by selecting one of the subscription options. See Account Detail Settings for information on the available settings.
The option to specify a Customer Code and Tax Code for the Ship to address is available.
If the Shipping Address same as Billing Address checkbox is not selected, additional Field Rep and Tax Code fields are available for the Ship Address which will be designated with the 01 ID.
Use the Add Permit button if a permit for a field is required when applying Restricted Chemicals and are issued by customer Ship To addresses. Enter a Permit Name of up to 50 alpha-numeric characters. The Issued and Expiration Date are both required fields and default to the current date and can be changed using the mm/dd/yyyy date format or select from the available drop down calendar.
If the customer is a Commodity & Grain Merchandising customer, select Dealer or Grower from the drop down menu available in the C&G Producer field. Retain the default of No if not a C&G customer.
Expand the Ship To section and click  which opens the Select Customer Ship To window. Choose a Ship To address by double clicking on the correct address or click once and click the Select button.
Add the number of Items for the permit in Items section and click . When the Select Item window select the item for the field. At least one Item is required to save the Permit to the customer account.
Add the Driver License and State for the customer account for receiving payment by check.