Line Item Usage Rates Prepaids
The ability to create and apply individual usage rates to items on a Prepaid is now available in Merchant Ag. This new functionality allows a Prepaid Type, also known as Program, to be created, items added and usage rates to be assigned. Add a General Ledger account at the Item Category level for visibility on Prepaid transactions. To utilize this new functionality, several components will need to be selected in Merchant Ag FIN and created in Merchant Ag PM. Access to the new functionality will be granted in Access User Profiles.
Merchant Ag FIN
Access Parameters
Two parameters in Merchant Ag FIN found on the AR tab of Admin > Installation > Access Parameters need to be selected.
- Default Prepaid Limit Use to Items to Checked
- Prepaid Type by Line Item
The ability to assign a usage rate by line item is set by selecting the parameter Prepaid Type by Line Item found in Merchant Ag FIN > Admin > Installation > Access Parameters > AR > Customers > General.
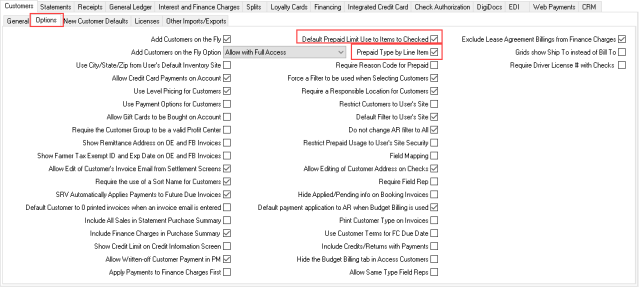
On this same tab, choose the parameter Default Prepaid Limit Use to Items to select the Limit Use to Prepaid Items checkbox on the Prepaid by default for new Prepaids. This limits the ability to use the Prepaid to settle transactions to only the Items on the Prepaid.
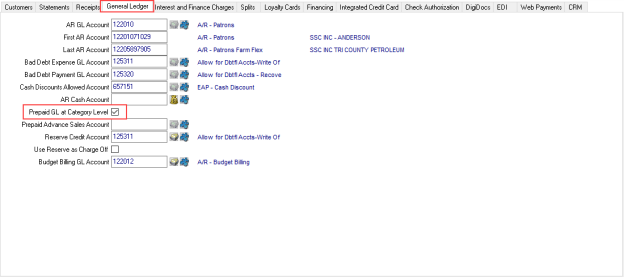
If tracking Prepaid transactions by Item Category is needed by using a specific General Ledger account, select the parameter Prepaid GL at Category Level on the General Ledger tab. Selecting this parameter prompts for a General Ledger account on the Item Category in Merchant Ag PM > Setup > Access Categories.
Access User Profiles
Grant security to users to the new options within Prepaids and to create new Prepaid types. Navigate to Merchant Ag FIN > Admin > System Security > Access User Profiles > select a Profile > Security > Orders module > Menu Security. In the Access Open Prepaids section, choose the options the user should have access to and select Save.
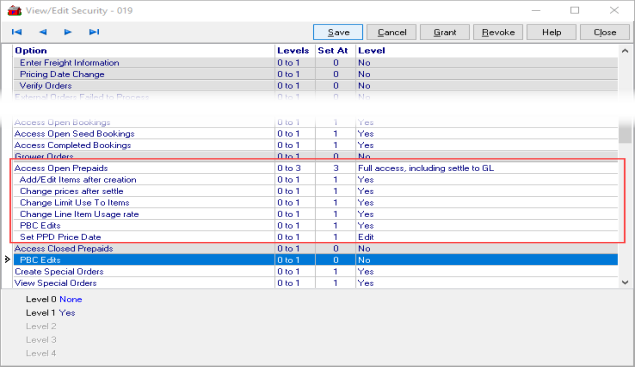
Grant access to Change prices after settle to enable the Swap button within the Prepaid Transactions grid. This will allow the user to swap an unused item on the Prepaid to a different item.
Any user that should have the ability to create Prepaid Types will need to have access granted in Admin > System Security > Access User Profiles > select a Profile > Security > Setup module > Menu Security. Select the new permission Access Prepaid Types and set to 2 for Full Access.
User Profiles that will be responsible for adding the General Ledger account within Access Categories will also need Setup > Access Categories set to level 3 to enter a GL account.
Merchant Ag PM
Create a Prepaid Type
Prepaid Types can be created for Items only, Items and Item Categories, or Item Categories only. Each option offers the ability to set the Usage Rate % for Item and Categories individually. Create new Prepaid Types, also known as Programs, in Setup > Access Prepaid Types. Use  to locate a Prepaid Type to review or edit an existing Prepaid Types or select
  to create a new Prepaid Type. An Unspecified Prepaid Type is created by default.
Begin by assigning an ID of up to 15 alpha-numeric characters then enter the Description of up to 50 alpha-numeric characters. Both these fields are required to create a Prepaid Type.
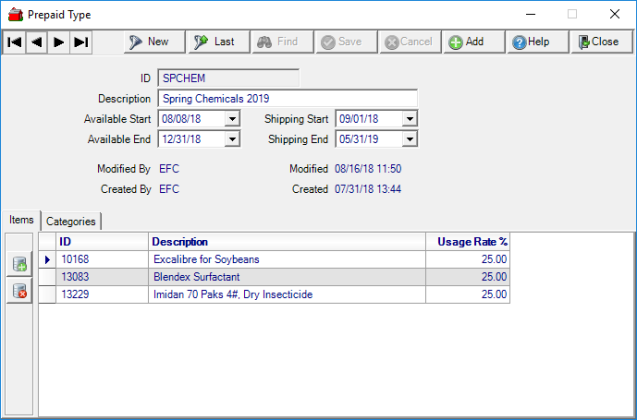
Set the availability of the Prepaid Type by entering dates using either the mm/dd/yy date format or the available drop down calendar in the Available Start and Available End fields. This indicates when the Prepaid Type can be selected as items are added to a Prepaid.
Indicate when the Items included in the Prepaid Type will be available to ship and be selected on an Order or Batch by entering dates in the Shipping Start and Shipping End fields. These dates control when a Prepaid can be selected on an Order or Batch.
Click  to access the Select Item window to choose the Items included in the Prepaid Type. Once selected, the Item ID and Description populate automatically and the cursor moves to the Usage Rate % field. Enter the Usage Rate % for the Item which is the percentage of prepaid funds that can be used to settle transactions for the item. Add additional Items to the grid and set individual Usage Rate % for each.
Access the Categories tab to include any Item Category to be included in the Prepaid Type. Use to add an Item Category which opens the Select Category window. The ID and Description populates automatically with the cursor positioned in the Usage Rate %. The Usage Rate % for a Category can be set to a different rate from the Items listed on the Items tab. When settling a transaction to a Prepaid, the usage rate from the Items tab is applied to matching Items and any additional items in the Item Category specified will use the Usage Rate from the Category tab.
Be aware that if creating a Prepaid Type for an Item Category only, the method to apply to a Prepaid will require selecting a Purchase Summary. Verify the Item Category has the intended Purchase Summary selected.
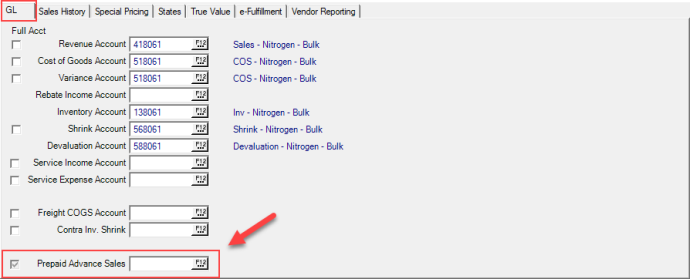
To track Prepaid transactions with a specific General Ledger account when the parameter Prepaid GL at Category level has been selected, use the Prepaid Advance Sales field to select a full GL account found in Setup > Item Category > GL.
Select a Prepaid Type for a Prepaid
Create a Prepaid and select the Transactions tab. Click to add a line item then enter the Item ID or use F12 to search. Use the tab key to access the Available Prepaid Types window listing all Prepaid Types available.
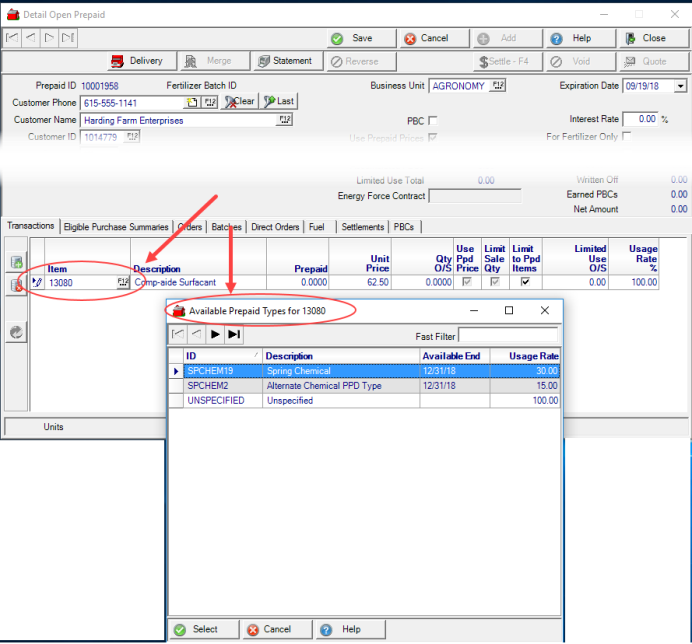
The Available Prepaid Types listed include only those that include the Item entered and the default Unspecified Prepaid Type. Double click the preferred Prepaid Type or click once and the Select button.
As Items populate the Transactions grid, the Usage Rate % indicated on the Prepaid Type becomes the default usage rate. This usage rate can be changed until the Prepaid is used to settle a transaction.
Swap an Item on a Prepaid
The option to swap an item on a Prepaid is available for Items that have not been included on an Order or Batch. In addition, if the Prepaid has been settled, to prevent a change in the Prepaid value, the option to change an Item is available only by using a Swap. Click on the item then use the swap button  to access the Swap Prepaid Item window. Enter the new Item ID or select F12 to search and finalize the swap by clicking OK. Items selected do not need to be included in the Prepaid Type and can be any item as long as the unit of measure is the same as the item being removed.
Swap a Prepaid Type
The Available Prepaid Types listed include only those that include the Item entered and the default Unspecified Prepaid Type. Double click the preferred Prepaid Type or click once and the Select button. Click the Prepaid Type Swap button  to select an alternate Prepaid Type.
Apply a Prepaid to an Order or Batch
When Items included on a Prepaid are added to an Order in Order Entry or a Batch, the Prepaid button appears in the upper left hand corner of the window. To select a Prepaid with a usage rate for the item, click the Prepaid button or select the drop down arrow. In the Select Prepaid window, all Prepaids that contain the item are listed.
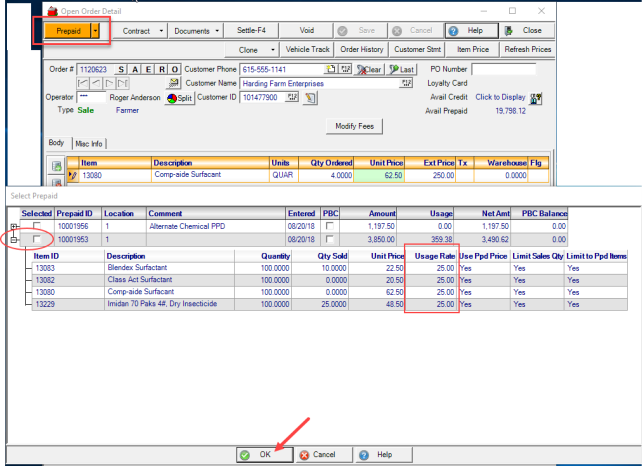
Use the plus sign to the left of the Selected column to expand and review the Items and usage rates on the Prepaid. Click the checkbox in Selected to apply the Prepaid to the Order or Batch.
Applying the Usage Rate, the first item line displays the quantity to be settled to the Prepaid and any quantity outside the usage rate becomes it's own line item to be settled with another tender.
Apply a Prepaid to a Split
Split orders can be settled to a Prepaid as above but the Split must be selected first, then select the Prepaid button to select the Prepaid to be used to settle the transaction.
A best practice for locations using an active Blender interface as set on Setup > Access Locations, use the Export to the Blender function in the Batch before selecting the option to split the batch and settling.
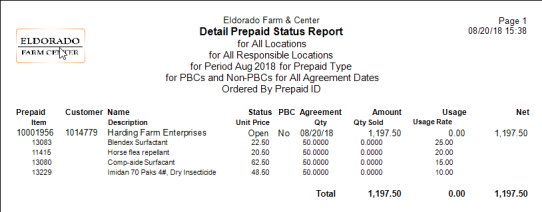
Updates to the Prepaid Status Report
Create a Prepaid Status report and choose to view the details of the line items included on a Prepaid by selecting one, multiple or All Prepaid Types.
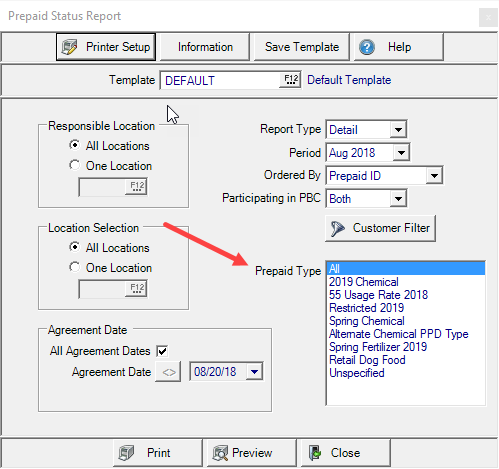
Choose the Report Type Detail to view a list of all Items and their usage rates entered on a Prepaid. Creating a Summary report provides the Prepaid ID, Customer and total amount of the Prepaid.