View, Edit or Add a Purchase Order from the Access Open Purchase Orders window. The top section of the Open Purchase Order detail window contains the information of who the items will be ordered from and where they will be shipped. Additional tabs below are where specifics of the Purchase Order will be entered.

From the Access Open Purchase Order grid click  to create a new Purchase order.
The PO Number is a system generated PO Number.
Initially, the PO Status is set to Requisition, but will update to Approved or Partial as the PO progresses.
 Enter a Vendor ID in the Vendor field or select F12 to search. Once a Vendor ID is entered, the following fields populate automatically from the AP Vendor account found in Merchant Ag FIN
|
|
|
|
|
|
Choose a PO Type of Inventory Warehouse or Non-Inventory which defaults to Inventory Warehouse. Select the drop down list to select Non-Inventory.
In Location, enter the Site ID number, where the items on order will be shipped to populate the fields below automatically. Locations creating a Non-Inventory Purchase Order can select the Location which populates the GL Department automatically.
|
|
|
|
The address fields can be edited on Purchase Orders but will not update the information throughout Merchant Ag PM.
A Location can be required for a Non-Inventory PO by selecting Require Location on Non-Inventory POs found in Merchant Ag FIN > Admin > Installation > Access Parameters > PO.
Choosing an Ultimate Vendor will limit the purchase order to items that have an Ultimate Vendor defined. If the Ultimate Vendor ID is unknown, select F12 to search.
Entering a Manufacturer ID limits the purchase order to items that have the Manufacturer defined. If the Manufacturer ID is unknown, select F12 to search.
Created By - Username, Date and time the Purchase Order was created.
Modified By - Username, Date and time of who made changes to the Purchase Order.
See Navigation Basics to learn more about the shared buttons in the header of the Purchase Order. Details are below for buttons specific to a Purchase Order.

If Browse Digidocs is available, select this icon to Browse for scanned PO's in DigiDocs.
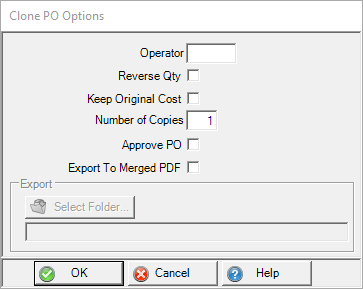
Select  to access Clone PO Options.
|
Enter the Operator ID which populates the Requested By field on the PO. Use Reverse Qty to create a return PO. Keep Original Cost retains all Item Cost from the original PO. The Number of Copies to be cloned can be as many as 99. If the User selecting Clone PO has access, the Approve PO checkbox is available to approve any PO cloned. The Export to Merged PDF option will export each individual PO to the location indicated in Select Folder in sequential order naming the file PO#.pdf. Additionally, one PDF file will be created merging all cloned POs in sequential order into one merged PDF titled PO_{locationID}_{date created YYMMDD}.pdf. The POs in the exported copy are labeled Our Copy and will include Notes and Manufacturer ID. No Vendor Copy or HazMat documentation will be included. |
In Email select the drop down list and select and option for emailing the Vendor Copy.
- Our Copy
- Vendor Copy
- Vendor Copy (Auto)- A copy of the PO will be emailed to the Vendor by the SRV task, Email Vendor Copies. See Daily SRV Jobs for more information.
- Vendor Copy (View PDF)- available if MS Outlook is installed for email. A PDF Vendor Copy of the PO is attached to an open email.
Click Print PO to print multiple copies of the Approved PO.
Use Rec Ticket to print a Receiving Ticket for the PO.
Use Update Vend to copy the Unit Cost for items from the Purchase Order to the Replacement cost field in Item detail > Vendors. If a different Unit Cost is used on a Purchase Order, the Item replacement cost will not be changed unless Update Vend is selected.
Click Update Cost to retrieve the latest replacement cost for Items from Item detail > Vendor to update the Unit cost on the Purchase Order.
Apply Disc will apply a discount to the PO.
Select Approve to update the PO from requisition to Approved.
Select Receive when items from this PO arrive and are received into inventory. See Receive Purchase Order for more Information.
Adj Qty, Adjust Quantity, is used in the Receiving process when the purchase order shows outstanding Item quantity that will not be received from the vendor. Click Adj Qty to update the PO status to Fully Received and set the PO to closed.