Customer Aging by Field Rep
Create a Summary or Detail Customer Aging by Field Rep report to view customer accounts with current and overdue balances for transactions that have a Field Rep assigned. Select a Summary report to view an account list with balance information. Select a Detail report to view each invoice that comprises the balance plus contact information for the account. The report total provides the total outstanding accounts receivable and totals each aging category.
| Access |
| Grant permission to User Profiles in Access User Profiles > select a User Profile > Menu Security > Reports > Main Menu > Accounting. |
| Grant permission to the individual report> Accounting > Customer Aging by Field Rep |
Create Your Report
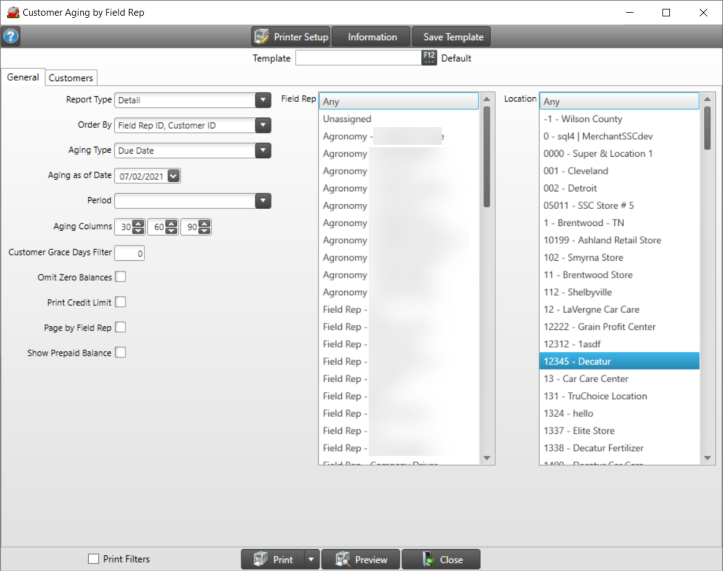
Use the Report Type field to select Summary or Detail for the report.
Use the Order By drop down to select either Field Rep ID, Customer ID or Field Rep Name, Customer Name
Select an Aging Type of
- Due Date-Shows the aging for the account based off of the invoice due date.
- Invoice Date-Shows the aging for the account based off of the invoice date.
The Aging as of Date defaults to current date. Enter an alternate date if required using the mm/dd/yy date format or choose from the drop down calendar. If this report is scheduled to run automatically the current date is used.
Period defaults to the current financial period. Select the drop down list to select the previous period.
Aging Columns on the report default to 30, 60, 90, indicating the number of days invoices are overdue. Decrease or increase the aging columns by selecting the down or up arrows.
Enter the number of grace days in the Customer Grace Days Filter. The number of days entered will be subtracted from the Aging Date and will filter out any transactions that do not meet this new date.
Omit Zero Balances is selected by default to exclude all AR accounts with a zero balance due from the report.
Select Print Credit Limit to include the accounts current credit limit.
Show Prepaid Balance will include the total available prepaid balance for each customer.
Choose Page by Field Rep to create a page break after each Field Rep with sub-totals and totals.
In the Field Rep column, select All, one or multiple Field Reps.
Use the Location column to choose Any, one or multiple Locations.
View the report on-screen by clicking the Preview button.
Use the Print button and print to the default printer or use the drop down list and choose
- Export to Excel
- Export to PDF
- Export Raw Data
(This is the Drop-down text)
Understanding Your Report
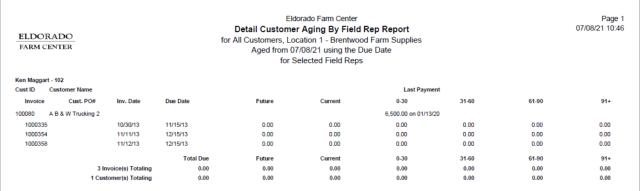
The Name and ID of the Field Rep begins the report.
Customer ID and Customer Name from the transaction is provided.
Invoice details include Invoice Number, Invoice Date, and Due Date.
 Non-sale transactions like Finance charges and debit memos are associated with the Primary Field Rep assigned to customer Ship To ID 00.
Any Future Due amount is included.
The Current Due amount is displayed.
The Last Payment columns are divided by Aging Columns as set when creating the report and display the due amount.
An Invoice Total and Customer Total for all amounts finishes the report.