View a list of customers with outstanding Accounts Receivable balances. Included in this report is Phone contact information as well as information on the last payment received.
| Access |
| Grant permission to User Profiles in Access User Profiles > select a User Profile > Menu Security > Reports module > Main Menu > Customers. |
| Grant permission to the individual report > Customers > Customer Collections. |
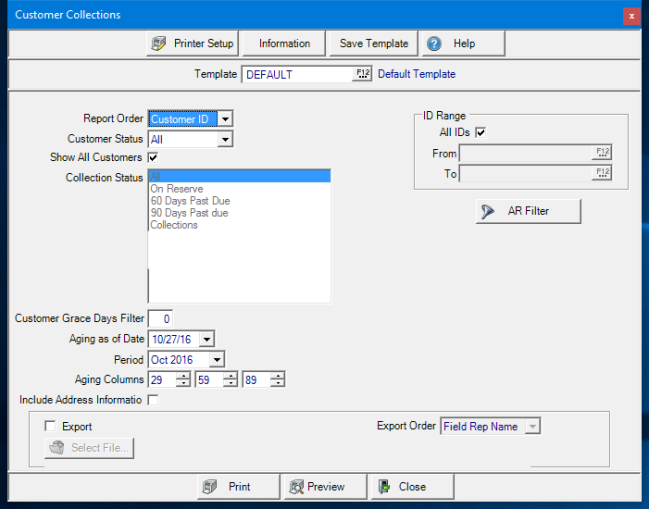
Create Your Report
Select a Report Order of either
- Customer ID
- Name
- Sort Name
Choose a Customer Status of
|
|
|
|
Show All Customers will include Customers without a Collection Status specified.
Collection Status defaults to All when Show All Customers is selected. If active, select one, multiple or All of the available Collection Statuses.
Add a Customer Grace Days Filter to remove the invoices with due dates within this number from the report..
Aging as of Date defaults to the current date. Choose an alternate date from the available calendar or enter a date using the mm/dd/yy date format.
Use the drop down menu to choose the current or previous Period.
The Aging Columns default to the standard of 29, 59, and 89 control how past due balances are segmented and displayed. Create custom Aging Columns using the up and down arrow available in the field.
Check Include Address Information to include the account address information.
In the ID Range section, all IDs are selected by default. Remove the checkmark and create an ID range by specifying
- From- Enter a Starting ID
- To- Enter an Ending ID
To filter the report, use an AR Filter. See Using a Customer Filter for more information.
Select to Export the report and choose the location it will be saved by using  . Use the Export Order drop down to chose Field Rep Name or Customer Name. When selected, the Export button becomes active and replaces Print.
Select Preview to view the report onscreen.
Select Print to send the report directly to the default printer.
Understanding Your Report
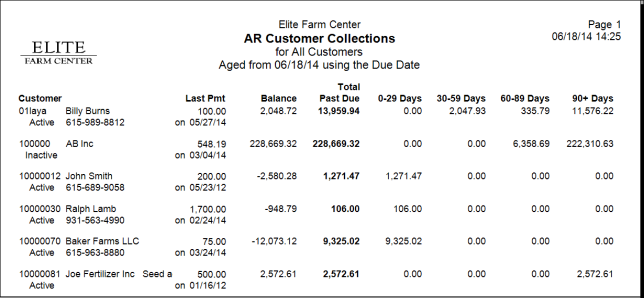
The Customer ID and Name will be displayed.
Customer Account Status displays the current status of the account as Active, Inactive or Delete.
The current Phone number from the account as found in the Phone 1 field on the account.
Last Pmt provides the Last Payment amount and date of the last payment on account.
Any Current Outstanding Balance on the account which includes current charges and total past due balances.
Total Past Due indicates the amount of the balance that is past due.
The past due amount will be segmented in the Aging Columns totals.
The Report Total includes a total of customer accounts and the Balance, Total Past Due and the Aging columns.